Materials Needed:
• (1) 4x4 piece of wood, 6 to 8 feet long (A 2x4 or garden stake will work as well, but a 4x4 is sturdier)
• (1) 2x4 piece of wood, 5 feet long (A garden stake will work as well, but isn't as sturdy)
• Wood Nails
• Post Hole Digger (or equivalent)
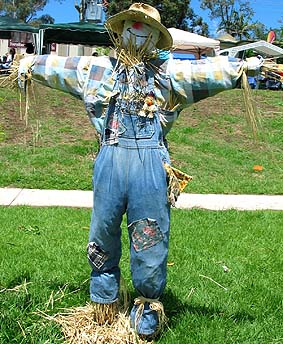
• Old clothes and accessories: Overalls, plaid shirt, straw hat, gloves, etc. These are suggestions for a traditional scarecrow, but you can customize by choosing whatever clothing and accessories you want your scarecrow to wear.
• Twine or wire
• Straw, hay, leaves, grass clippings, wood chips, or other stuffing material.
• For the head: 1 Burlap Sack, 1 pillowcase, or 1 pumpkin
• Hammer
How To Do It:
1. Build The Body Frame: Center your 5 foot piece of wood (arms) about 12 to 18 inches from the top of the longer piece of wood. Nail them together with at least 2 nails. I would use 4 to add stability.
2. Shirt: Begin by putting a shirt or jacket on your scarecrow. Place the sleeves over the horizontal arms of the scarecrow frame, then tie the ends of the sleeves and bottom of the shirt with twine or wire of some sort. Use your choice of stuffing (Hay, straw, etc.) to fill out the shirt.
3. Overalls: Place the overalls on the scarecrow frame. Cut a hole in the seat of the overalls and run it over the vertical pole from the bottom. Place the straps over the frame's shoulders. Tie off the bottom of the legs with twine or wire. Use your stuffing to fill out the legs.
4. Gloves: If you wish to add gloves, now is the time. Put stuffing in the gloves, tuck them under the ends of the shirt sleeves, and tie them down with twine or wire. You may choose to skip gloves, and let the hay or straw stuffing stick out of the sleeves, like older, traditional scarecrows.
5. Boots/Shoes: Stuff the bottoms of the pant legs into your chosen footwear. Secure them in place with glue, double sided tape, or whatever fastener you may have available.
6. Make The Head: If using a burlap sack, pillowcase or other type of sack for the head, fill it with your choice of stuffing, place it on top of the frame, and then secure it in place with twine or wire. If using a pumpkin, first carve it into a jack-o-lantern with your choice of faces. Instead of carving a hole in the top, try carving one in the bottom. This way, you can set the jack-o-lantern right on top of the frame, and your verticle piece of wood will support it from inside.
7. Face: Use paint, or any materials of your choice to make your scarecrow's face.
8. Accessories: (Optional) Feel free to add hair (use straw, or a wig), a hat, glasses, whatever you want.
9. Dig A Hole: To stand your scarecrow frame upright, dig a small hole in the ground with a post hole digger or other tools. Dig at least 6 inches deep, maybe 12. The deeper the hole, the more stable the frame will be in the ground. But, you also lose height as you bury it deeper.
10. Stand Your Scarecrow Up: Place the bottom of your scarecrow frame in the hole, and fill in around it with the dirt dug up in the previous step. Make sure it is stable. If it isn't, you may have to dig your hole deeper to stabilize it.